Using SolidOpinion for Community Features
In This Topic
SolidOpinion is a popular choice for adding discussion and community features to web content, with some unique ranking and moderation features to help enage your users and build a community around your content.
Setting up SolidOpinion for Community Features
To enable Community Features using SolidOpinion, you must first register a "Site" with SolidOpinion that uniquely identifies the content you will be using SolidOpinion Community Features in and then configure the settings on the Community Features page in the Build Profile Editor.
Register a Site on SolidOpinion
Open the Build Profile Editor and select the Community Features page.
Tick the Include Community Features option.
Select SolidOpinion from the Community Provider drop down.
Under the Settings heading, click the Create New button (or visit https://my.solidopinion.com/addsite).
This will take you to the SolidOpinion Log in page.
If you have an existing account with SolidOpinion, login.
- or -
If you don't have an existing SolidOpinion login, click the Sign Up For Solid Opinion link underneath the login button and once you have signed up, select Add your first site under I am a website owner on the sign up confirmation page.
The Add a new site page will be displayed:
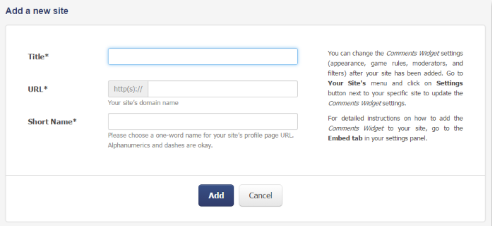
SolidOpinion Add a new site page
Choose a Title to identify your documentation project. This should be a descriptive name, e.g. "Fabrikam Documentation".
The value you provide in the URL field must match the Url (or be a parent url) to which you will be publishing your content.
Type a unique name in the Short Name field. This must be a unique name across sites using SolidOpinion so you may wish to prefix with your company name, e.g. "fabrikam-documentation". Make a note of the value you choose here, as you will need it when configuring your project later.
Click Add to save the new site
Configure the Build Profile to use SolidOpinion for Community Features
- Open the Build Profile Editor and select the Community Features page.
- Ensure that the Include Community Features option is ticked.
- Ensure that SolidOpinion is selected from the Community Provider drop down.
- Under the Content Publishing Url section, identify the location to which your content will be published. If you are using Publishing features you can select from an existing Publishing Target, otherwise type the Url into the Use this specific Url\Content Url field.
- Type or paste your SolidOpinion Site Short Name into the Solid Opinion Short Name field (see Register a Site on SolidOpinion section above).
Managing Community Content
Once your project has been configured for Community Features you will find the Moderate Content and Manage Settings are enabled on the Community Features page in the Build Profile Editor. Those butons will launch a browser that will take you to the correct page on your chosen Community Provider's website.
Once you have Built and Published your project after configuring the Community Features page, you will also be able to view and manage community content directly within the Topic Editor and Content File Editor and of course directly in the generated output.
See Also